The ITR Heat Oasis CH50 is a diesel hydronic heating system that is pre-installed in the 2019 Dutch Star. This provides for domestic hot water, and furnace heating for the whole RV and basement. The oasis is powered by either the diesel burner, or by electrical providing either 5k or 10k BTU. Engine waste heat is also used to provide heat energy to the distribution module, allowing for all system functions while driving without the use of additional heat sources.
All units are pre-wired for the engine loop pump. The panel will have to be replaced with one that provides the Engine Preheat Pump switch, and the pump will have to be installed inline.
I opted to go with the ITRTouch Remote because I liked the look and it provided the function for preheat. When replacing an existing switch, you will need to order the over sized ITRTouch remote to cover the hole used by the original, which is taller and slightly more narrow than the new one. You can use the new ITRTouch without the pre-heat option. If you want to play with a demo of this switch, ITR has one on their website located here.
The new remote is 1/4″ wider than the standard switch. Once the hole is the proper size, the wiring harness will connect to this switch as a direct replacement. The pump was $295, and the new remote was $260.00 before any applicable discounts.
To perform the installation of the pump, you will need several items:
When I started the install, I only had 2 sets of hose pinch pliers, and they were too bulky to properly close the hose in the cramped area. I ended up spilling about 2-3 cups of fluid before I gave up and reconnected the hose. I then researched what I could get delivered in 1 day from Amazon, and found these clamp pliers. What I liked about this style is that they are not vice-grip style, using a ratchet style system instead.
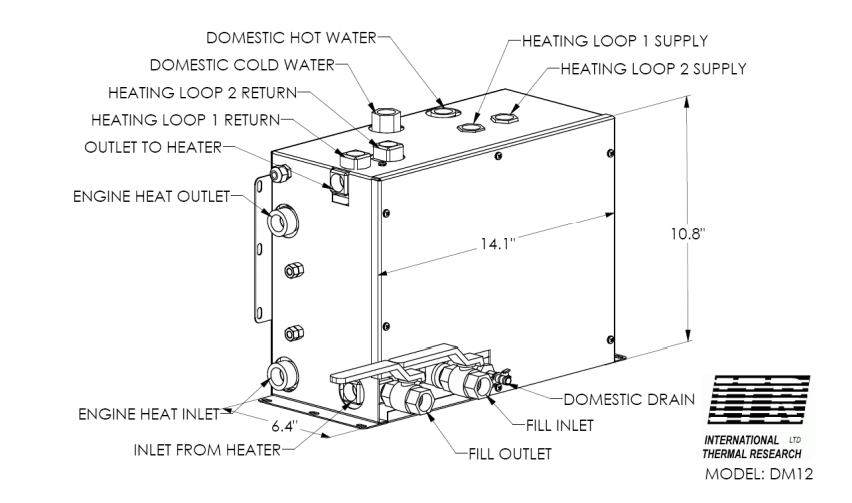
ITR Oasis DM12 Distribution Module
Newmar places the DM12 distribution panel behind a wall in the bay just behind the pass thru bay. Removing the wall will expose the DM12, and provide you with access to perform the full installation. Looking at the graphic for the DM12, you will see that the left side is where the engine coolant inlet and outlets are located. The pre-heat pump is installed on the outlet side, with the pump oriented to return the coolant to the engine.
Place 1 clamp on the inlet side, about 3 inches above the clamp, and another on the outlet side, about 6 inches from the clamp. I used a 3rd clamp and clamped the line higher up at the frame rails. This allowed me to capture the fluid in the line in a controlled manner, and have more flexibility with working with the hose.
Once the outlet is disconnected, place the pump in the final position and connect the engine side to the pump. There is not enough room to connect the pump and then re-position it to the back wall. The other hoses will not allow for the pump to fit through. Also pay close attention to the routing of the return hose, ensuring that it will not rub or kink. I had to alter how it routed from the frame rail down to get a proper alignment. I personally did not have the proper tools for easily handling the continuous pressure clamp, so I removed this and replaced with a worm-gear hose clamp.
Install the 4″ of 3/4″ heater hose to the outlet side of the DM12 and connect to the pump.
Secure the pump to the back wall, but use caution on the screws length,as the other side is where all of the 12v electrical connections are located.
The electrical needs to be connected to the pump using the spade connectors. The wires are red and black, and are exiting the DM12 above the outlet connector. They will be crimped together for protection. When doing the final routing of the electrical, make sure it does not rest along the heater.
After cleanup of any spilled fluids, place clean white towels around all connections that have been replaced, and run the engine for 30 seconds. Verify that your towels remain clean white, and that there is no leak.
Next, bring the ITR up to running temp and turn on the pre-heat option. Verify the pump is operating.
Since I had spilled so much fluid, I was worried about the air in the lines, and the loss of fluid. I ran the pre-heat pump for several hours, which was overkill, and then topped off the reservoir with coolant.
The final step was to take a test drive and bring the engine up to operational temps and let it remain for 30 minutes. This was about an hour total of driving. After that, I was satisfied that there would be no leaks, and closed it up.
For a view of the Remote Control operation of the Oasis, view this video.
For a view of the final pump installation and commentary, view this video.
When I purchased my 2013 Dutch star, one of the first upgrades I did was install HWH Active Air. This system allows for air leveling of the coach, while retaining the factory hydraulic leveling options. When driving, Active air works proactively to maintain levels of the coach, preventing the lean that occurs when making lane changes, or radius exits.
HWH does the installs at their factory in Moscow, IA. The job is a 5 day job, always starting on Monday and work being complete early Friday. All of the components are manufactured onsite, and custom fit to the coach.
The active air is very noticeable under some extreme test conditions that I did, but the weather was not bad, so I didn’t have a very many times when the Active Air went into fly mode.
Fly mode is when the screen goes to green, and is actively adjusting the level of the coach to counteract conditions. When driving with a strong cross wind, or having a semi meet you on a 2 lane road at 80mph, the Active Air will usually go into fly mode.
I was able to make it go into fly mode by cranking the wheel hard right to left, trying to get the back end to break loose. I also did a sudden 3 lane change (no traffic around me) and quick return 1 lane over, which would normally cause a lot of body roll, but the coach handled great.
I am going to describe many of the things that I have experienced. I am going to start with the opening statement of:
“WOW – I AM VERY GLAD I DID A FACTORY PICKUP”
The experience I had this week has blown me away. The absolute professionalism, attention to detail, and good ol customer service is just the beginning of why I am happy.
I did a factory delivery in 2013, and during that time I never met my team lead, and had very little feedback. I was still happy then. Part of the issue in 2013 is that I rushed them to meet a deadline, and should never have done that.
This time, I did the exact opposite. I gave them 6 weeks instead of the standard 4 weeks to prepare. This was primarily due to a planned trip to Europe, but also knowing that the time would potentially be used to address items.
I was asked about how you do a factory delivery with a family, and I held of on responding until I tried it. My oldest 2 are in college, but we home school our 11 & 7 year old children. I wanted the entire family to participate, but the 6am schedule was going to be rough, and then there is the whole question of what do we do from 6am to 2:30p.
The new service center is very nice, but it feels like a library when you walk in there with 2 young kids.
To make things easier on our family, I rented a home for the week. We drove from Texas and arrived Sunday afternoon and settled into the home. Monday morning at 8:30 we arrived at the new facility and got to work inspecting and learning.
After the initial OOH’s and AahHs, the kids went to work opening every door, looking for scratches, missing parts, and anything that would later be blamed on them.
My wife started looking over the paint, and I started playing with all the new gadgets inside.
My 11yr old son took charge of testing the electrical circuits using the plug in tester, and made an interesting discovery right away that the kitchen table and couch are not on GFCI but the other side is. (more on that later)
My 7yr old daughter found areas under the slide where the protectant was scratched exposing raw wood…it was just at the right height for her. She was so proud, she wanted to make sure I posted that
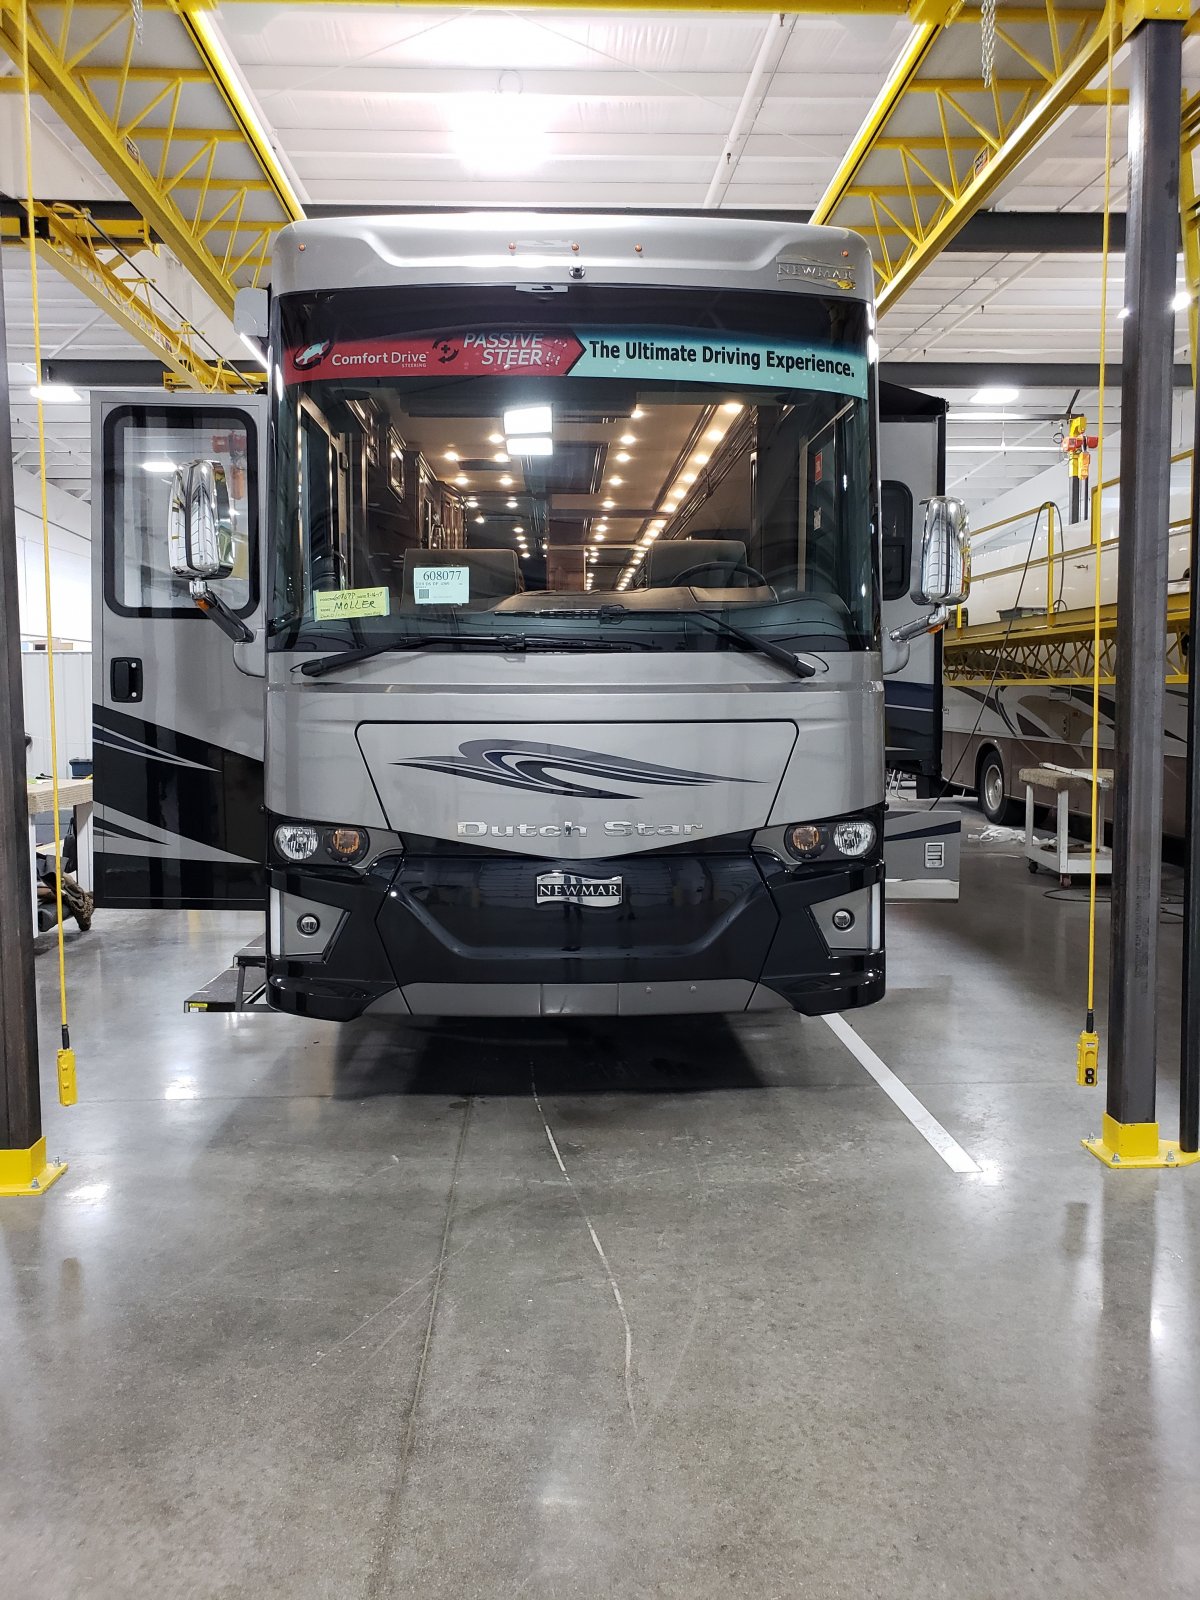
The family spent all of Monday with the coach, and then we all went on a test drive. During the test drive it was obvious that the coach was driving much better than our 2013.
Freightliner has really improved the ride. Keep in mind, that we are comparing a 2019 Stock 43′ Dutchstar to a 2013 43′ Dutchstar with Active Air. The smoothness of the 2019 is very noticeable. I think this has to do with better shocks, and larger tires. Our 2013 had 315/80’s all the way around, where as the 2019 has 365’s up front. Being able to drop from 115psi to 105psi up front helps a lot too.
After the test drive we spent the evening testing more, and building our list.
–FPU DAY 1 Items found—
Throughout the day we made lists of items found. Our tech was with us the entire time, making note of what we found and creating work orders. I found it helpful to keep my own list, and then verify that our lists were in sync.
The biggest area of concern I had was the paint. We found many areas where there were buff marks. I am going to get out of chronological order here for this issue because this is not yet resolved. Through out the week, this list kept getting bigger as we would move it into different lighting and find other areas that have problems. The end result is that I will be returning at a later date for paint booth time. There are areas of the coach that need to be painted, and my lead felt that the cut and buff was not done properly, and needs to be fixed. I will know more later, but I felt this was the right answer. Three different days we had areas worked on, only to later see that the area worked on had new problems not previously seen. The lighting in the service bay is not proper for doing paint work, and you cannot see the swirls inside there.
Other issues found Day 1 are below. I am going to list the problem, and the resolution, even though the resolution most likely happened during the week.
Interior:
Area below Kitchen sink had a trim piece unglued. –Resolution: Hot glue gun applied the trim
Zone 2 of the AC was showing 55 degrees for inside temp when all other zones showed 72 –Resolution: This was an issue that showed up a few weeks ago for another tech. That tech spent about a week trying to figure it out. This is actually an error code that does not exist, so it shows an improper temp. The problem is the freeze sensor was malfunctioning. The freeze sensor is in the rooftop unit, and inserted into the coils. When this malfunctions, it will report a lower than normal temp. There is not a magic number of what will be displayed, it will just be lower than normal. R&R freeze sensor resolved the problem.
Kitchen slide was making a noise during operation — Under the kitchen sink, toward the rear of the coach is a bundle of pipes and wires, all in a wire loom and zip ties. This is a very tight bundle that was catching on a metal trim piece as the slide operates. By trimming the aluminum, enough clearance was possible. The noise was eliminated, and a visual inspection during operation shows that there is no more contact.
Exterior:
Bedroom slide under coating has tear, exposed wood.
Resolution: Sealant applied over tape to prevent moisture entry
Fresh Water hose had kink going to back-flow device
Water reel leaning/bent
Resolution: The kink was due to the way it was routed, and the hose being too long. The water reel had to be R&R in order to fix the bend in the aluminum. Once the reel was removed, the tech cut the line shorter and routed the back-flow device towards the back of the water bay (out of site). This made for a straighter path, with no kinks. The spool was reinstalled, and required a shim on the back corner to keep it looking straight.
12v Electrical panel behind Shore cord was not closing properly
Resolution: The tripod option I had selected for ground satellite connections had 2 cables running in a way that prevented the panel from closing. These cables had to be re-routed.
Caulking Issues: Multiple areas had caulking issues. Day 1 I found about 3, but throughout the week I kept finding more the harder I looked. The areas that had issues are: Girard Awnings, Girard Shades, Drivers window, Front Cap trim on driver side, driver side marker lights, side cameras, front LED lights, Kitchen slide top rear corner, Front foot well, and mid coach roof trim joints.
Slide LED lights Don’t match Girard Lights
Resolution: The Girard lights are preinstalled by Girard and are a “Cool” light. Newmar does not purchase or stock any led light strip that is cool. All of their led strips are a warm light. This is used in multiple places, such as the pantry, the front driver cabinet and the stair entryway.
Newmar does have an led bar that is cool, used in the bays of the coach, but this is a different type fixture, and comes in specific lengths, not cut to fit. The answer ends up being, there is nothing that they are going to do about it, other than make a note to production for future coaches. This is easily resolved on amazon, and something I may do.
Peg board bay extremely hard to close Resolution: Although all bay doors are hard to close when new, this one was not going to close. The tech adjusted it so it would close better.
Diamond brite had stretch marks, bubbles, and scuffs.
Resolution: The Diamond brite section was removed and reinstalled. The guy that did it made it look so simple, I was amazed. I have heard how other struggle to get it to come off. He used a water soap solution, along with a heat gun. Once he got a corner going, he kept it wet and heated and just pulled on it. He didn’t allow it to tear, which appears to be key.
Newmar logo on full wall slide was crooked
Resolution: It was R&R. I thought this was funny, as it wasn’t just off slightly…it was very crooked
Chassis Issues:
Both drive axle outer wheels where scratched badly
resolution: Newmar really came through here. Originally I was told this would not be repaired during FPU, but I would have to deal with Freightliner at a later date. I wasn’t looking forward to a Freightliner visit so soon, but didn’t see any other option. On Wednesday, when my Team leader returned from vacation, he placed a call and had new wheels delivered same day. Newmar paid a local tire shop to R&R the wheels on the coach, and I was able to get the shop to install my Centramatics at the same time. Worked out perfectly!
Chassis battery bay clips broken on fuse box Resolution: A new fuse cover was delivered, and reinstalled
Engine block shows rust, along with rust on several accessories and pullies Resolution: Freightliner treated all of the areas and repainted. They used a wax heat paint, but I was never able to get the brand.
This is the end of the Issues found and reported during the FPU that are warranty items.
While at my FPU, I discovered the doors to the bedroom do not allow for any privacy. I brought this up with my tech on Tuesday. I didn’t know that this was an issue when I placed my order, and it wasn’t until after my coach was built that I even knew they had glass.
I also brought up the lack of what is called a privacy box in the front side windows. I showed him a couple of pictures found here of what I wanted.
They tried to have the wood work completed by Friday, but it was clear on Wednesday it wasn’t going to happen. Since I have a scheduled appointment in Iowa for HWH Active air, I could not wait until Monday, so we have agreed that I will return after my Active air to have the millwork items installed.
Another request I made during FPU is the anti belllow device for the Girard slide toppers.
While discussing this with the team lead and my tech, they agreed that the magnets need to be added to their checklist and checked all of mine. They all needed to be adjusted, and that was done as part of the warranty work.
I asked them to install 2 additional antibellow brackets on my FWS, and 1 each on the other slides. They were unable to put the main awnings out inside the shop, and it was raining very hard, so we didn’t deploy the awnings. I found out today that the rear awning does not clear antibelow device on the bedroom slide, so I had to remove it. The bedroom slide topper is the smallest, and held with the same 2 magnets as all of the others, so it is the least worrisome.
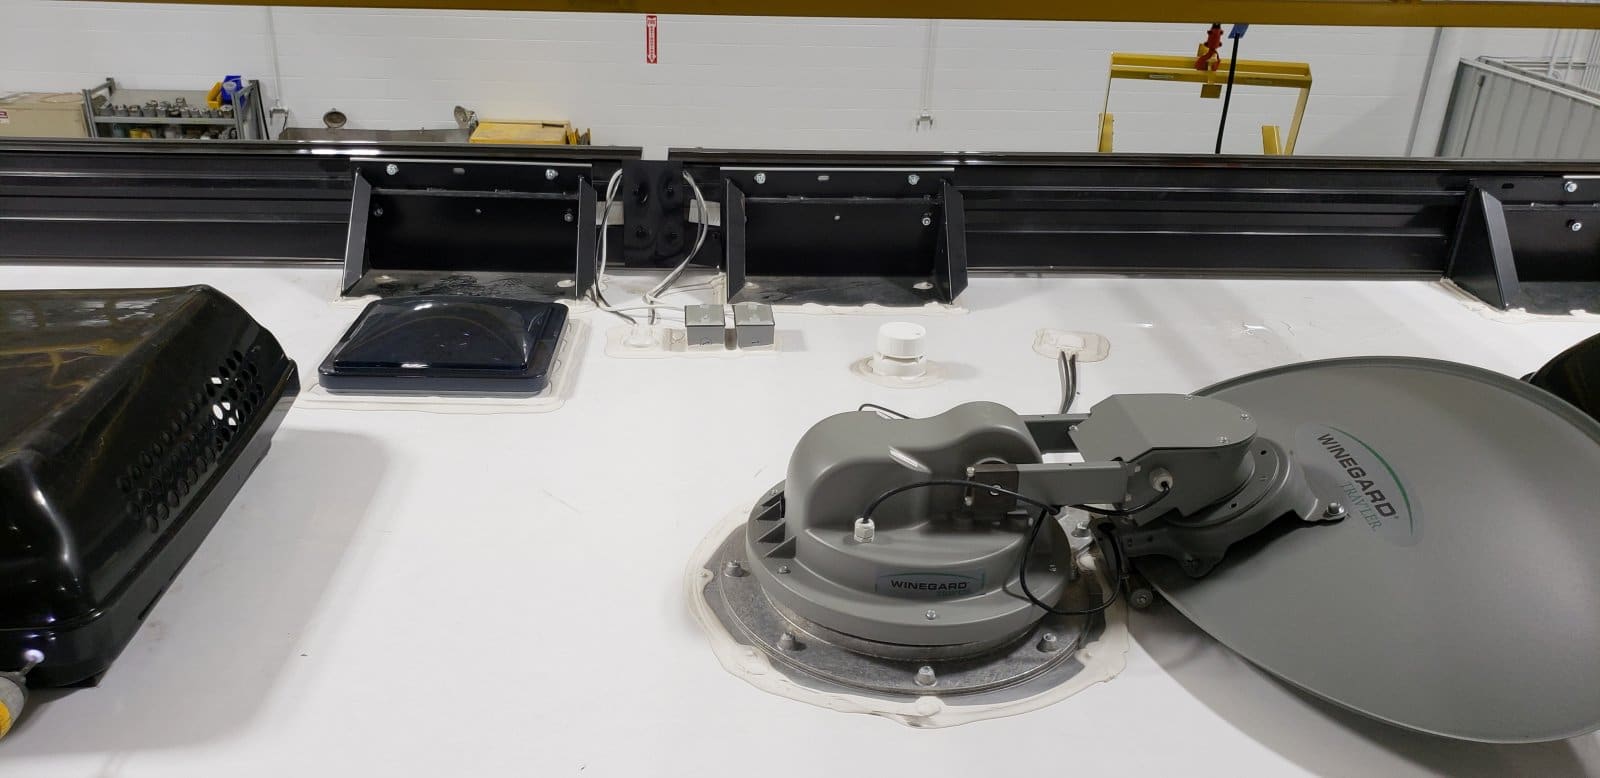
Wednesday was the day that the Air conditioner issue was worked on. The new service center has a nice catwalk system to be able to safely walk around and access the roof of the coach. While the tech was working on the air conditioner, I went up there and took pictures of the roof and accessories.
While I was up there, I started looking for my prewire specials (1 Cat 6 and 1 RG6) and discovered it was not labeled. We had to put in a request for this to be located. Friday morning the techs arrived with a toner, and started hunting. They found it after about 30 minutes of looking, with only a single hole in the roof, and then removing a ceiling light.
The cables where then covered with a plate and sealant. Glad I discovered it missing when I did.
A few of the special projects I did during the down time this week are install the BMK and the HW50C Surge protector.
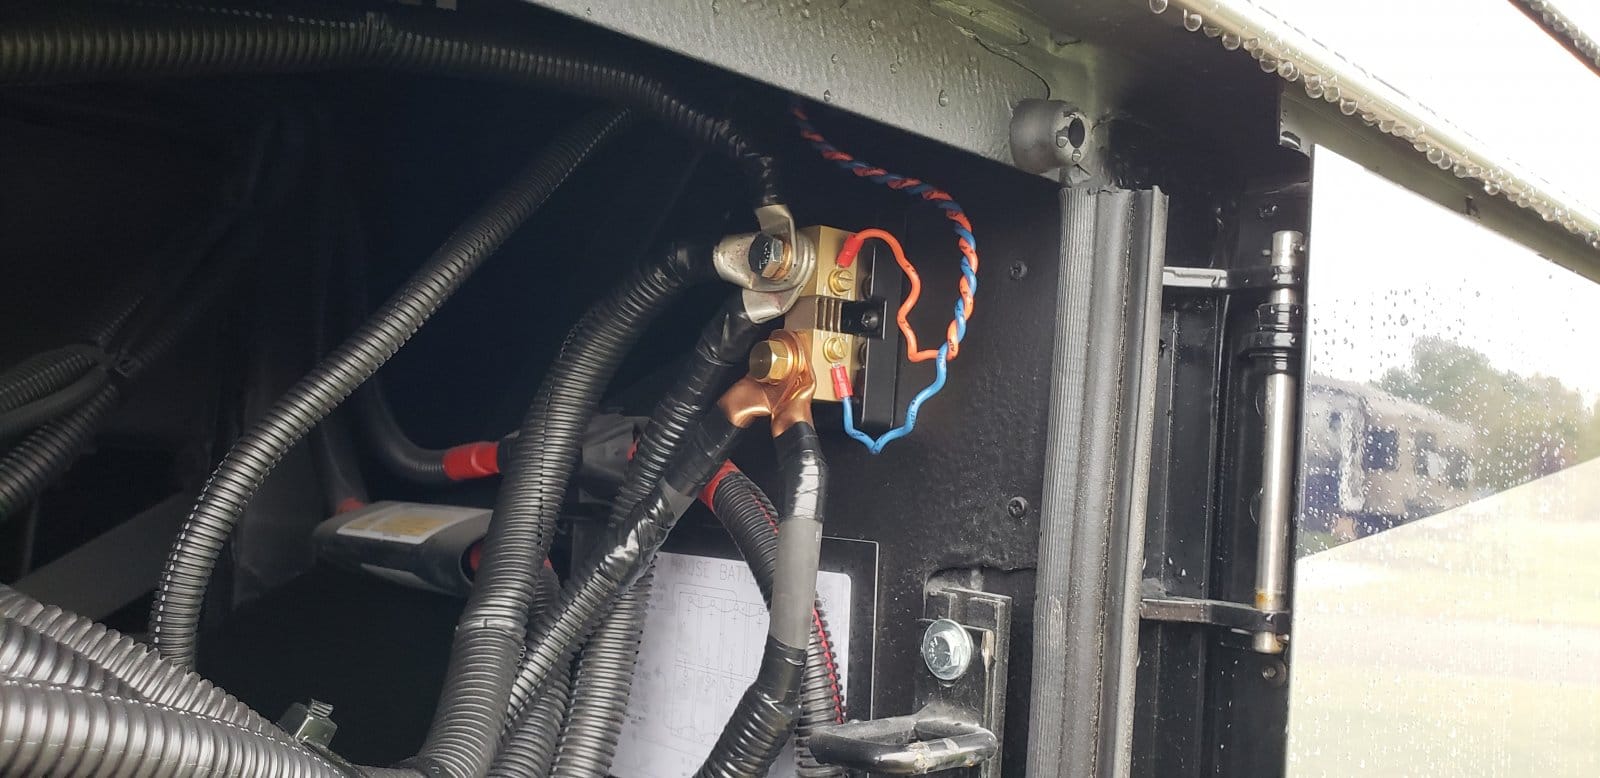
The BMK installation was a priority for me, as this is the best way to maintain a healthy battery.
In order to install this, I needed 2 4ft 2/0 Cables made. I was able to get this from Newmar as a parts item.
The default battery configuration has 3 ground wires connected to the battery bank, in 2 different locations. I removed those 3 cables, and placed them on the load side of the shunt. I then chose the battery furthest from the positive connection to run my negative wires to the battery side of the shunt, using both 2/0 cables between the shunt and battery.
With this installation, the battery tray will still fully extend.
**CAUTION:: When disconnecting your batteries, you must remove the POSITIVE first. Failure to do so will destroy all of your inverter accessories such as the BMK, AGS-N, and possibly the inverter itself. The positive cable is the first to be removed, and last to be installed. Never disconnect the ground while there is a positive battery connection.
I know this defies how we were all taught to deal with DC connections, but this is specifically mentioned in the Magnum manual.
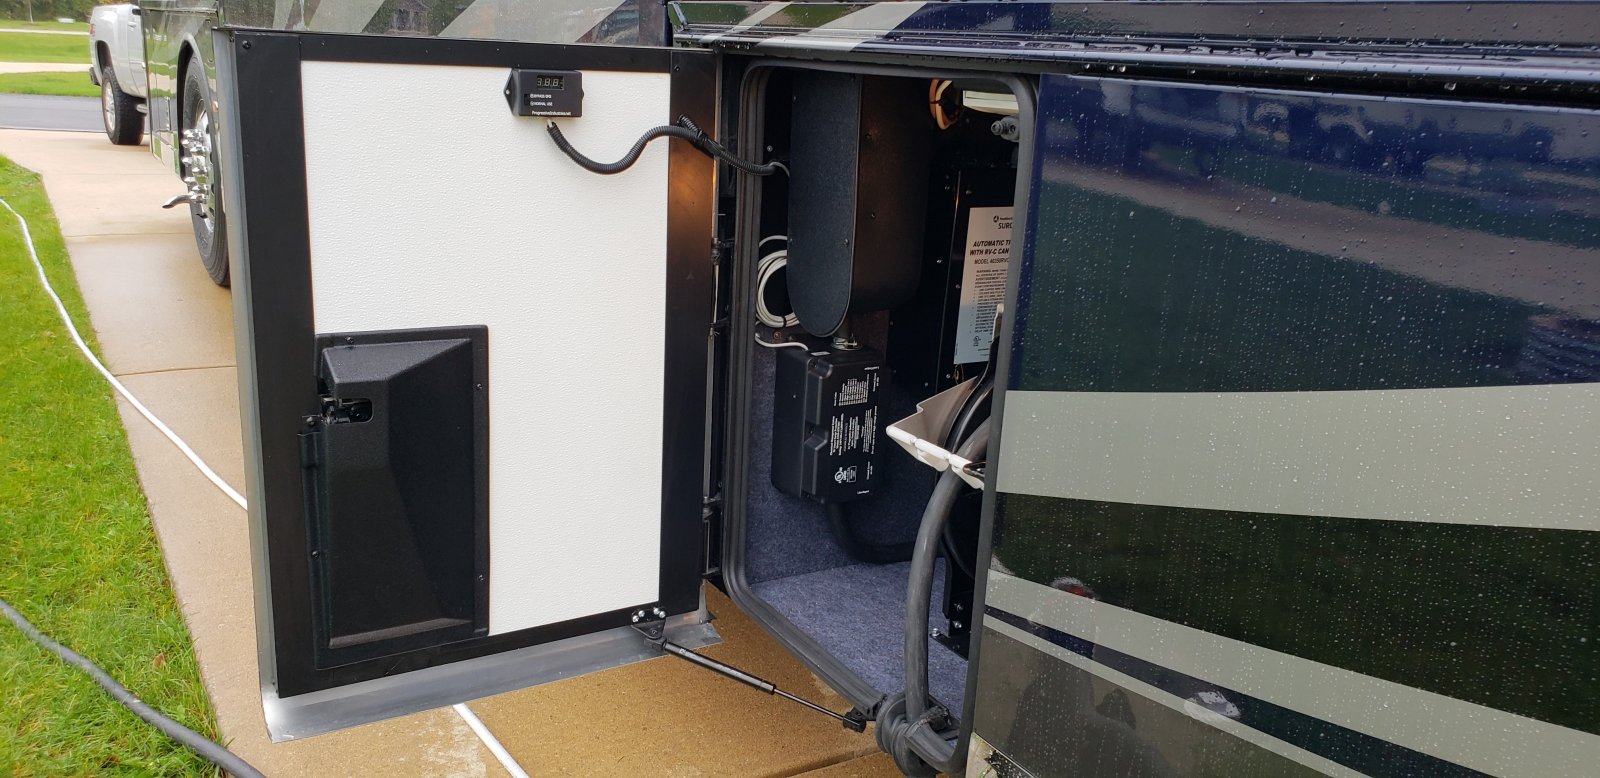
For the surge protector, I wanted to make sure I could easily return back to the factory setup if I ever wanted to. I removed the cord from the reel to the surge/transfer switch, and installed that to the input side of the EMS-HW50C. I had previously ordered a 4ft section of this same cord from GlennDinning, and used that to run from the output of the EMS-HW50C to the input of the Surge/Transfer switch.
The location I used for mounting the EMS-HW50C was where the cable/ground sat connection was located. I relocated that to the ceiling of that bay, since it is rarely used, and still very usable in the new location. This allows for easy access to the EMS-HW50C. The remote was secured with 2 sided tape to the bay door.
A fun place to find helpful information for your Newmar Motorhome