Introduction
Batteries exist in an RV because they are a necessity. Many of the systems simply cannot function without a battery. The 12-volt DC battery bank powers all interior lighting, climate controllers, exhaust fans, heater blowers, and many other areas.
My first RV was a 5th wheel, and it had a single 12-volt deep cycle battery. This battery powered the lift jacks, and I quickly discovered that it would not do so for very long. The battery was charged while the 7-pin connector was attached to the pickup, or while the RV was plugged into shore power.
My next RV was a 2008 Fleetwood Discovery with a much more advanced system, and one that I never fully understood. It had a flooded cell battery system and I learned after 3 years that they require water. I had to replace every battery because I had ruined all 4 batteries. I also had a huge mess in the battery bay from the corrosion caused by the off gassing. I spent a lot of time cleaning it up when I replaced the batteries, but was unaware of AGM batteries, and replaced it with flooded cell again. The problem reoccurred 2 years later, but at that time I was trading it in and didn’t care.
I custom ordered a 2013 Newmar Dutch star 4347. One of the specials I requested at the time was an upgrade to AGM batteries. During this time, I did a deep dive into the entire 12-volt DC power system and was amazed at what it could do, and how simple it really was, once it was fully understood.
I am writing this guide to share the knowledge I have gained. Most of what I have learned comes from others.
Ronnie F. Moller, Jr.
redbaron73@gmail.com
Who is this guide for?
This guide is written based on my experience with Newmar coaches utilizing the Magnum inverter/charger. It will also apply to any other manufacturer that has the same or similar setup. The Basics section will apply to 90% of RVs on the market, including the Newmar gas lineup.
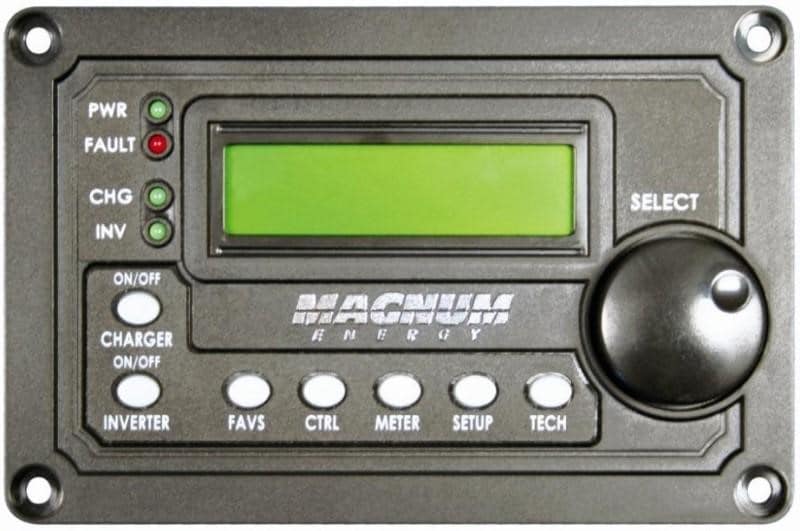
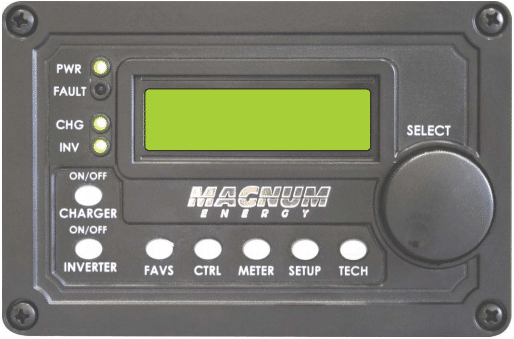
The In Depth is more specific to coaches with a Magnum Inverter/Chargers ME2012/MS2012/MS2812, which includes the Newmar diesel coaches, but not the Luxury diesel line with the Xantrex chargers. The luxury line utilizes both depending on the year, so you need to know which system you have specifically. The simplest way to tell if this applies to you is by looking at the controller for your inverter charger. If you have one that looks like the one shown in Figure 1, then this document applies to you.
This document designed for those that are normally plugged into shore power, but on occasion will be using the battery power and want to be prepared. I use of my generator liberally and have no concerns about over usage of a generator, but there are times I want to limit the usage, such as when boondocking in perfect tent weather. Our family likes to camp on BLM lands near the Pyror Mountain Wild Horse Range. The night time temps in August are typically in the 60F range, and the skies are some of the darkest we have been to. This is true off the grid, and we will spend 2-3 nights camping out there. Nothing ruins the tranquility and peace like a generator running. We manage the generator to run during the day, often while we are out looking for the wild horses. At night, we run the entire coach on batteries. We can make coffee, heat water, shower, and charge cell phones without the need for shore power.
What this guide is not
This guide is not meant to apply to every coach or every situation. This guide does not address solar energy and is not designed for the unique needs for those on solar.
If your coach does not have a generator, or if your batteries do not charge while driving, then you will need to adopt different strategies than what this document outlines.
Basics
Battery Capacity / Amp Hours
From the day I started driving a car, I was aware of the size of the fuel tank and closely monitor the gas gauge. I understood how far I could drive before refueling, and never pushed the limits. While this seems obvious for a motor, I didn’t consider doing the same thing for my RV batteries when I first started. After continuously being disappointed with my batteries, I learned that there is an equivalent rating on RV batteries that tells you how much power capacity each battery has, Amp Hours, expressed as Ah.
The Ah rating describes the ability of the battery to provide power over a 20-hour period. If the rating is 100 Ah at the 20-hour rate, then the battery can supply 5 amps for 20 hours. (5×20=100).
Using the battery for all 20 hours would result in a completely consumed battery. The life of the battery, or number of discharge/recharge cycles, is based on how low the battery is discharged prior to being full recharged. Each battery manufacturer provides data on life expectancy as it relates to depth of discharge. Generally, one should never discharge below 50% before fully recharging. Using our above example, a battery with a 100Ah rating should only be used at 5 amps for 10 hours before being recharged.
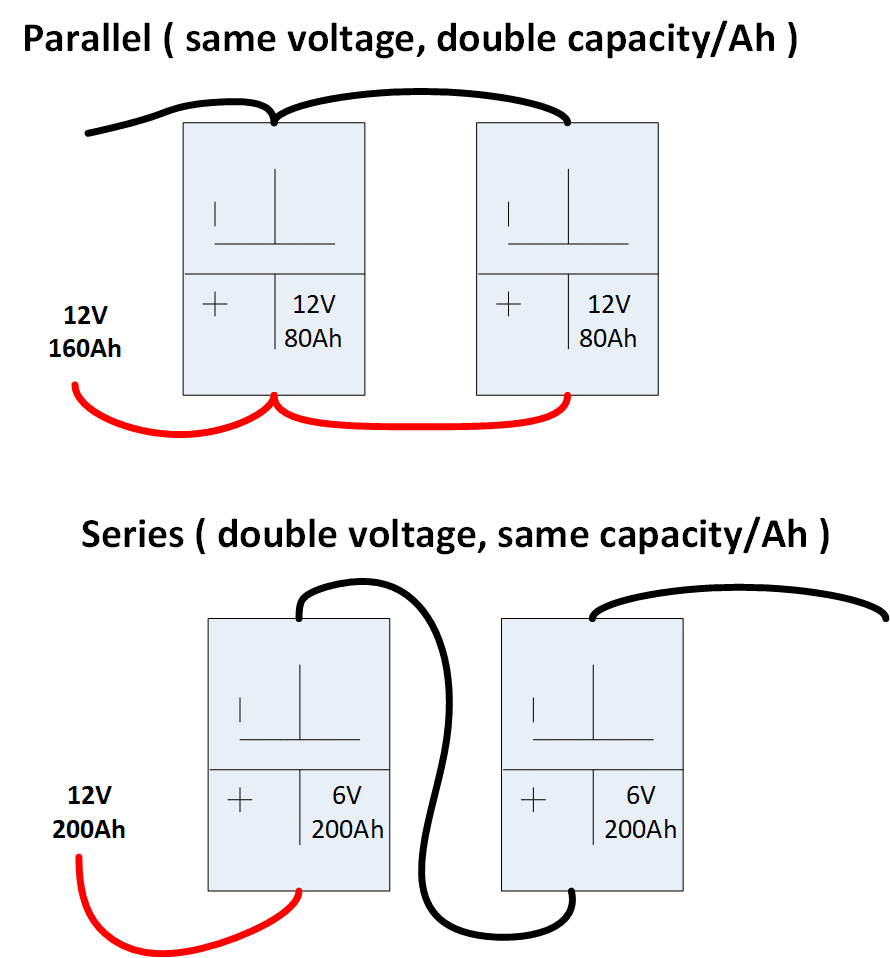
To increase capacity, multiple batteries can be connected in parallel. This keeps the voltage constant while doubling the Ah. Four batteries rated at 100Ah connected in parallel will deliver 400Ah, or a usable 200Ah based on the 50% guideline. This could be 5 amps for 40 hours, or 20 amps for 10 hours.
Battery Voltages
Newmar coaches, as well as most other RV’s utilize 6-volt batteries because they provide a greater capacity. In order to bring the battery voltage up to 12-volt, two batteries are connected in series. When two batteries are connected in series, the voltage is doubled while the capacity remains constant.
To illustrate why a 6-volt setup is preferred, consider these batteries:

Option 1 – 12-volt Batteries:
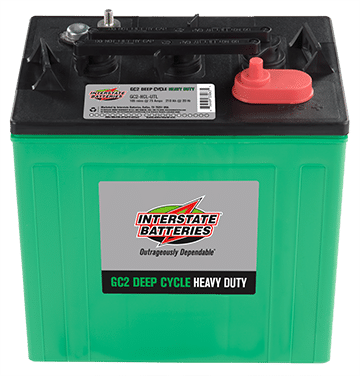
A total of 6 Interstate SRM-24 ($113.95 retail per battery providing 81Ah and weighing 46lbs.) would provide 486Ah, with 243Ah usable at a cost of $683.70 and a total weight of 276lbs.
Option 2: 6-volt Batteries
A total of 4 Interstate GC2-HCL-UT ($142.95 retail per battery, providing 210Ah and weighing 58lbs.) would provide 420Ah, with 210Ah usable at a cost of $571.80 and a total weight of 232lbs.
Both batteries are similar dimensions, meaning that you need less space to with the 6-volt battery setup for similar power delivery. With the additional money savings, and weight savings, it is easy to see why the 6-volt setup is the way to go.
Battery types
It is important to know what type of battery you have. The most common batteries are lead acid type of batteries, and those are the ones we will be discussing. Less common batteries are the newer Lithium batteries. This document does not cover lithium batteries, but this is a topic you should explore if you are looking at the ultimate boon docking setup.
Lead acid batteries are designed either for starting or deep cycle. This document is focused on the deep cycle type of battery, used for inverting 12v power to 120v house power. In this application, starting batteries should not be used or considered. Starting batteries have a higher plate count and deliver greater amounts of energy in quick bursts. The plates in a starting battery are much thinner and are subject to warping when fully discharged. Once warped, the plates can touch and cause a serious electrical short with thermal runaway. For this reason alone, one should avoid using a starting battery on the house side of RV electrical system. For more information, see this link: https://batteryuniversity.com/learn/article/corrosion_shedding_and_internal_short
Deep cycle batteries have much thicker plates and can handle the deep discharge without danger. As a result, deep cycle batteries deliver less instant energy but have a greater endurance.
Deep cycle lead acid batteries are commonly found in 2 types. Flooded (Wet Cell) and Absorbed glass mat (AGM).
Flooded Wet, serviceable
The standard battery Newmar includes with most coaches is the 6-volt flooded wet cell battery which is serviceable. A serviceable battery requires that the water levels be maintained. The advantage of this battery is the low cost and high amount of energy available for continuous usage. These batteries are typically used in golf carts and are designed to be cycled to a deep state of discharge.

Flooded wet cell batteries require a great deal of maintenance. The batteries also are highly corrosive and can be easily boiled if the charger is not setup properly. These batteries do not like to sit for long periods of times without a charge and do not recover well from a very low discharge. The batteries remain popular primarily because of their high availability and low cost when compared to AGM batteries.
AGM
Absorbed glass mat (AGM) batteries are a non-spillable deep cycle lead acid battery. They may be mounted in any position and are maintenance free. AGM batteries do not expel hydrogen gasses like the flooded wet cell batteries do, and as a result there is no loss of either water or electrolytes.
The design of AGM batteries allows for additional plate surface area when compared to the same group size of a flooded wet cell battery, increasing both the burst energy as well as the overall capacity (Ah) of the battery in the same size.
Additionally, AGM batteries have a lower overall resistance, allowing for a faster charge and slower self-discharge. These batteries perform very well sitting at rest fully charged, holding their charge much longer than a flooded wet cell battery.
AGM batteries are generally maintenance free. All this benefit comes at a cost. When comparing similar batteries, the cost often approaches 80-120% more for the AGM vs Flooded wet cell.
Example Interstate Batteries for comparison
Wet Cell: Interstate
GC2-HCL-UT ($142.95 retail, 383 Reserve Capacity, 210Ah, 58lbs.)
AGM: Interstate
GC2-HD-AGM ($324.95 retail, 475 Reserve Capacity, 210Ah, 66lbs.)
Battery maintenance
All batteries require proper maintenance. Never discharge the battery below 50% capacity. Never store a battery discharged, always fully charge your battery.
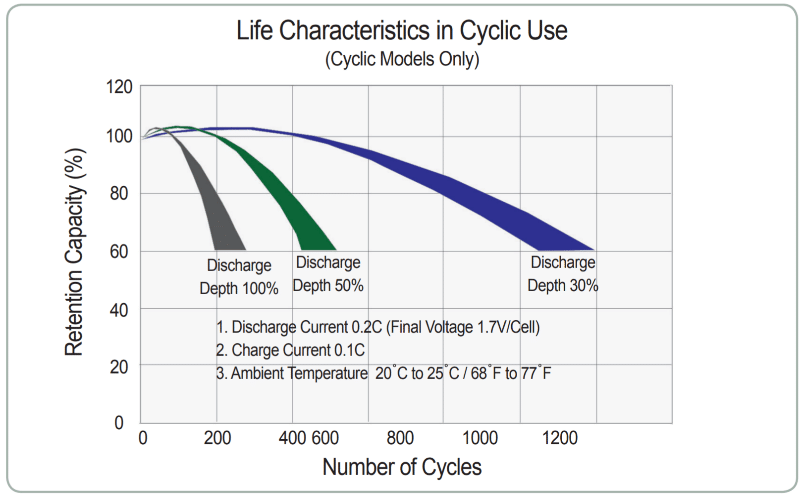
All batteries have different lifetime characteristics based on cyclic usage, or the number of times the battery is discharged and recharged. This characteristic is affected by how much capacity is taken from the battery (discharge), the operating temperature, and the charging method. All batteries differ on the number, but all batteries perform better when they are kept cool and are not discharged too deeply. See Figure 5 – Source: discoverbattery.com for a chart that demonstrates how battery life is affected by discharge cycles.
In order to get the maximum performance, safely from your battery, a clean and tight connection is mandatory. Battery terminal connections should be inspected routinely. There is a lot of vibration that occurs when driving your RV down the road, and the batteries are often exposed to the elements. It is a good idea to clean your battery connections every time you wash your coach, which for me is at the end of every trip, and sometimes more often. While doing this, check your cables and make sure they cannot be moved. If they are loose at all, tighten them.
If you have AGM batteries, then you can stop reading, as your battery does not require any other maintenance.
Serviceable wet cell
Cleaning should be done monthly. If you do not clean them the corrosion will build up very quickly and spread. It does not take long for the cables themselves to become very corroded. Once this happens the only fix is to replace the cables, which can become very time consuming and is not cheap. A mixture of water and baking soda ( 1 Tbsp baking soda to 1 cup of water) is a great way to clean the battery terminals. Use an old toothbrush to apply the mixture directly. Rinse with water.
Serviceable wet cell batteries also require routine fluid checking. This should be done at least once per month, and only when fully charged. NEVER add water to a discharged battery. When adding water, distilled water is the best option. Tap water has other minerals in it that can affect the performance and lifespan of the battery. If you don’t have access to distilled water, tap water is better than waiting or ignoring it. Do not let the water level ever drop below the plates, but also be careful not to overfill. Remember that in the summer the battery will run hotter, causing the fluid to expand. When water overflows (called boiling over), you lose the electrolytes that are in the battery. Not only is this very corrosive, but it also is necessary for the battery to function properly.
Most of the corrosion is caused by the gases leaking from the battery. I have read different strategies for adding mineral oil to the batteries. The theory is the mineral oil will sit on top of the water and prevent the gasses from venting out. I have never done this and offer no opinion on the subject. This is something you should research and determine if it is suitable for your use.
Charger
Most motorhomes will have a combined inverter and charger. Some RV’s will have a converter/charger and a separate inverter. Regardless of the design, the two functions are unique and controlled independent of each other. With a combined unit, a single controller operates both functions under different menu selections.
When does it charge?
The charger requires 120-volt AC power in order to operate. This can be provided by either the generator or shore power cord. Once 120-volt power is present, the charger will engage, depending on the settings. All chargers require proper configuration for the type of battery they are charging in order to properly maintain the lifespan of batteries.
What does it charge?
The charger is responsible for maintaining the house batteries. In most motorhomes, the charger will also maintain the engine battery. This is controlled by an isolating relay that will swap between the chassis and house batteries.
Other Charging methods
While driving, most motorhomes will charge both the house and chassis batteries from the alternator. This will allow lights, heating, microwave, and other 12v items to be used while driving without depleting the battery. The ability to keep up with demand varies by coach. Both of my Newmar Dutch stars have been able to handle very large inverting loads including microwave, refrigerator, television, DVR, laptops, etc. and arrive at camp fully charged.
Inverter
The inverter is responsible for taking 12v DC power from the house battery bank and changing it (inverting) to 120-volt AC power. This allows for common household items such as hair dryer, microwave, coffee pot, residential refrigerator, etc. to operate without the use of the generator or being connected to shore power.
All inverters have a maximum rating, expressed in watts. The base 2019 Newmar Bay star sport has a 1000w inverter to operate the pumps, and an optional 1000w inverter for the televisions. The 2019 Newmar King Aire has two 3000-watt inverters and 16 6-volt batteries, allowing for one of the air conditioners to be run from the inverter. The size of the inverter determines how much AC electric power you can use. If you pull too much, the inverter will shutdown with a fault. Running it close to maximum will cause a lot of heat and load on the batteries and discharge them quickly. Typically, items like the coffee pot, microwave, or hair dryer will cause the most load, while TV’s will consume very little load.
When does it invert?
The inverter must first be enabled on the main control panel. Most inverters can safely be left turned on all the time. While turned on, the inverter does consume a small amount of battery even without a load. This is good to know if you are storing your RV without power or need to stretch the battery life. Turning the inverter off will ensure that it is not drawing any power from the battery.
You will need the inverter turned on in order to operate any 120-volt AC device when there is no external power source available, such as shore power or generator. My inverter is always on. I store it connected to 50-amp service.
If 120-volt AC power is present from either the generator or shore power, the inverter will not engage. Some RV’s, including the Dutch star, have a feature called inverter-assist. This will allow the inverter to supplement the power available from the shore cord or generator. This is commonly used when connected to 30-amp service and running the microwave along with the roof air conditioners. The startup of either takes more power than a 30-amp service can provide, and the inverter assist can provide that extra power. This is not an unlimited source of power though, and the batteries will eventually discharge to the point the inverter will shut off.
What is powered by the inverter?
This depends on how the coach was wired. Newmar uses an electrical subpanel from Precision Circuits Inc. This has a separate panel for the inverter circuits. On my Dutch star this supplies all the exposed outlets in the coach, all the outlets in the basement, refrigerator, and microwave.
It does not power the washer, dryer, roof air, electric stove top, basement freezer, or engine block heater. The basement freezer is a 12-volt DC and 120-volt AC device. It is more efficient to run 12-volt DC directly vs inverting to 120-volt, and Newmar wired it accordingly.
My 2019 Newmar Dutch star has a 2800-watt inverter, and on a recent trip I was able to overload it. The combination that overloaded the circuit was running the microwave along with the central vacuum while making coffee. Not the typical work load for most people, and this was the first time I had ever overloaded the inverter.
In Depth
The details provided here are specific to the Magnum chargers and the RC/ARC controllers. See Figure 1 for the controller that must be present. If you do not have this controller, then much of what is described in this section will not directly apply. For coaches with a computerized screen such as Silverleaf, the principals apply but the settings will require translation or interpretation.
One very important note regarding battery connections specifically with Magnum inverters. When disconnecting the battery cables, you must first remove all POSITIVE cables before removing any ground cables. The reason is that Magnum utilizes remote modules that are connected to a network power cable. These devices provide a weak ground signal. If the Magnum loses the primary ground, it will hunt for ground along the network control path and end up damaging all the remote devices. These are items such as the Auto Generator start, the Precision Circuits controller, and the RC/ARC controller. This is a very costly and expensive mistake, and one that is easy to make as it defies how most 12-volt DC connections are handled. When reconnecting the cables, the positive cable should be the last cable connected.
Battery connections
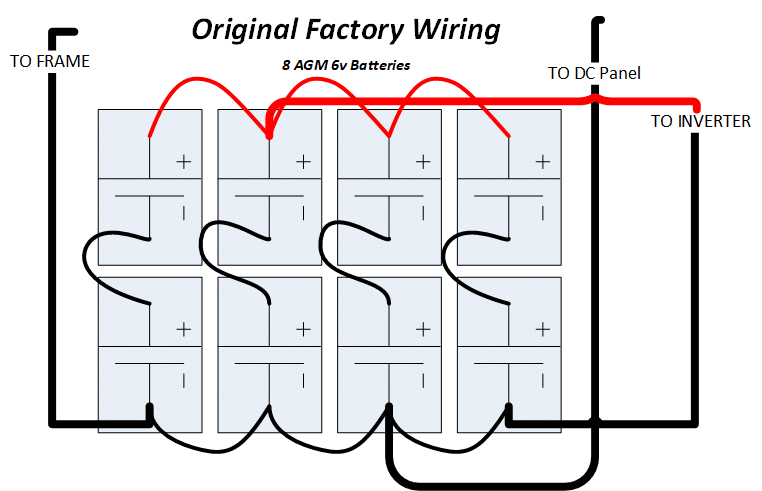
The battery connections must be tight and clean. The next step is to ensure the battery connections are at opposite ends of the battery. See Figure 3 for a proper connection. The positive cable should be opposite of the negative, allowing the entire battery bank to be utilized. Both of my Newmar coaches where delivered with an incorrect battery cable layout. See Figure 6 as an example of the incorrect wiring. Notice how 3 separate cables where connected to different battery cells for the ground, and the positive connection was in the middle cells. The result of this improper wiring is underutilization of the entire battery, as the electrical circuit would take the shortest path, often bypassing other battery cells. This would allow some batteries to discharge while other batteries remain unused. This is very simple to fix by simply relocating the battery connections to opposite ends. Be sure to disconnect the positive cable first and reconnect it last.
Battery Ah remaining / State of Charge
The remaining battery capacity is known as the state of charge (SOC). There are several methods to determine the SOC. The most common ones used are specific gravity measurements, voltage-based estimation, and current-based estimation.
Specific gravity measurements are not convenient and very few people would use this method. It requires using a hydrometer and testing the level in each cell. This method is primarily used to test a battery that has been fully charged to determine how well the battery is performing.
Voltage based measurements are the most common method used, as it is the only method that is available from a stock RV. The problem with this method is the measurement will vary based on load. When an inverter is under high load, such as powering a coffee pot or microwave, the instant voltage readings on a battery are unreliable. Using voltage-based methods often gives the appearance of bad batteries, and causes frustrations when boon docking, with short intervals between auto generator starts.
Current based estimation is the most convenient method for a very reliable battery state of charge. This method uses a value from 0-100% to show the amount of battery charge remaining, just like a fuel gauge. Power is measured in both directions to calculate the state of charge. Magnum inverters can use current-based data for AGS and Inverter settings once the ME-BMK and shunt are installed on the system.
Why you need a current-based estimation system
No RV should be without a current-based estimation system. Using voltage-based estimation is highly inaccurate and overly frustrating. To illustrate the difference between a voltage-based measurement and a current-based measurement I setup a test. My battery bank provides 840Ah of capacity with the 8 AGM discover batteries.
Starting with a full charge, I disconnected my shore cord and observed the status with only my residential refrigerator running along with my network and DirecTV equipment. The load was 20-amps DC, and the battery voltage reported 13.1-volts DC. After 5 minutes, the load remained constant as did the voltage. I then turned on my microwave, a GE Profile Advantium, using the convection oven to heat to 350F. The battery status immediately displayed 191-amps DC load, and battery voltage of 12.2-volts DC. I ran this load for 30 minutes. The battery status reported a voltage of 11.1-volts DC. Many systems would have disengaged the battery by this time, and if AGS is being utilized, the generator would have started. To further stress the system, I engaged the central vacuum putting a 291-amp DC load on the battery bank, with a reading of 10.9-volts DC. I ran this for 5 minutes, with battery voltage readings fluctuating between 10.9-volts and 11.1-volts DC and power loads fluctuating between 178-amps and 291-amps DC. This was based on when the microwave was energizing the heat vs stable.
Using only the voltage-based system, the generator would have auto started, or the inverter would have cut out based on the sustained low voltage reading. When the load was removed, the batteries reported 12.7-volts DC, which shows that they were truly never discharged. In fact, using my current-based measurement, I still had 94% battery life remaining. This was a very high load for a very long time.
This is the reason I said in the beginning of this section, No RV should be without a current-based estimation system.
Documentation for the installation and setup of current-based SOC gauge is in the Advanced Setup section of this guide.
Document Your System
The components in your system will determine the required settings. It is important to have the following information documented. Take time now to fill out this information, as it will required to properly configure your inverter and charger.
Personal Settings Record
A. Battery Type (Choose One): _____Wet Flooded _____AGM
B. Number of 12-volt battery banks: ______________
If individual batteries are 12-volt, enter the total number of batteries
If individual batteries are 6-volt, enter ½ the total number of batteries
Example: For a battery system comprised of 8 6-volt batteries, the value should be 4
C. Battery 20Ah Rate: _________
D. Inverter Model: ___________
E. Charger Model: ____________
F. Max Charger DC Output (See Table 1) ___________
G. Battery Bank Capacity: __________Ah
Multiply value in [B] above by the value for [C]
Table 1
The common chargers used by Newmar are listed below. If your is not listed, you need to find this value before continuing.
| Model | Max Output (Amps DC) |
| MS2000/12, MS2012 (-15/ -20B) | 100 |
| MS2812 | 125 |
| MS2024 | 60 |
Magnum Settings
Common ME-RC settings
The common settings are found under the Setup menu.
01 – Search Watt:
5 Watts
02 – Low Battery Cut Out: 11.0
This value is one reason why you should install the ME-BMK, since the voltage is measured under load, and false low readings are common. With a ME-BMK installed, this value can be set to a more reasonable 10.7 or lower.
03 – Absorb Time: _______________
Magnum provides a chart for determining the best time, based on amp hours of the battery group. To keep it simple, compare your value in [G] to the values below
200-300Ah – 60
Minutes
310-500Ah – 90 Minutes
510-700Ah – 120 Minutes
710-900Ah – 150 Minutes
04 – Battery Type: _____Flooded ____AGM2 ____AGM1 (Non-Newmar provided)
Newmar coaches will have either Flooded or AGM2. Look at your value in [A] and choose the correct option above. All Newmar AGM batteries are made by Discover, even though they may have a different label. Discover batteries are type AGM2. If you replace these with Lifeline AGM batteries, that would be AGM1.
05 – Charge Rate: ________ (see instructions that follow to compute this value)
AGM batteries typically can be charged at 100% rate, while flooded need to be set to a value based on a formula. The formula is C/BMr, where C = the total amp-hour capacity of the battery bank and BMr=Battery manufacturer rate. Follow the steps below to compute the proper value for charge rate.
C: __________ Total Amp Hours
Enter your personal settings value [G] above
BMr: __________
Compare the value you documented in your personal settings [A].
For Flooded a value of 10-20 should be chosen. Interstate GC2-HD batteries have a charging current of C/10, so you would enter 10 for the BMr. If you do not know the value, then a conservative number of 20 should be chosen.
AGM batteries from Discover are a value of 5.
Max Charge Rate (C/BMr): ______
Instructions: Divide
the value in C by BMr
Example: If your battery bank is 840Ah with AGM
batteries, then Max Rate is 168amps
Personal Settings –Max Charger DC Output [F]: ______
Final Charge Rate %: _______ (Use this value for 05-Charge Rate above)
Instructions: Divide the Max Charge Rate by the value for your personal settings [F]. This will give you the proper charge rate. If the value is > 1, then 100% should be set. Otherwise set the percentage that is closest to your number without exceeding
Example: Your charger has a Max Charger DC Output [F] value of 125amps. Your battery bank is 200Ah flooded (C), with a BMr value of 10. 200/10 = 20amps. 20/125 = .16 or 16%. 05-Charge rate should be set to 16%
06 – VAC Dropout: 90 – 100 VAC
This setting is the minimum AC voltage that must be present on the INPUT side of the inverter before the Inverter will switch to standby mode. The default setting of 80 is too low for the residential refrigerator and many electronics. This value could be set even higher, such as 100VAC safely. It really depends on the quality of the electricity where you are camping, and how often you want the inverter to take over.
09 – Final Charge: ________ (see instructions that follow to compute this value)
If your value in [A] is Wet flooded, then you need to use the “MULTI” mode. This will prevent the batteries from over charging and reduce water consumption. The batteries will charge to a full charge and then stop charging until the battery voltage drops below 12.7V, then it will restart charging. The display will read “Full Charge” once it has entered the waiting state.
If your value in [A] is AGM, then the proper value would be Float. This will keep the batteries at a full state of charge.
Common Usage Scenarios
For normal operation, the charger and inverter should both remain turned on. This will allow the charger to maintain the battery bank anytime AC power is available, either from the generator or shore cord. When AC power is not available, the inverter will supply AC power to the residential fridge and other power sources by drawing DC power from the battery bank.
The inverter will consume a small amount of power even without a load. For this reason, if the coach is to be stored without electrical hookup, the inverter should be powered off by pressing the power button on the remote control labeled “inverter”. When the inverter is disabled, the residential fridge will not be powered.
Hot Weather with 30-amp shore power
Connecting to 30-amp power can be problematic without proper planning. Newer coaches will have an automated energy management system (ems) that makes the experience much more enjoyable. The ems will borrow power from the inverter to help with burst energy, will automatically lower the charger rate, and will disable power to high load devices to prevent breakers from tripping.
Without an ems, the charger can be manually disabled or lowered. Disabling is not a long-term solution, as the 12-volt system will still be used for lighting and many other accessories, and the batteries will eventually drain. Disabling the charger for a few hours is generally safe.
Driving without Generator
When driving, the alternator will provide a charge to the coach batteries. This is generally enough to keep the batteries full while using the inverter to power the refrigerator, televisions, and even the microwave.
Auto Generator Start
While the inverter can supply some household devices the 120VAC, it does not have the ability power all the air conditioners. With the integrated Auto Generator start (AGS), the magnum inverter can start the generator based on a request from the air conditioner thermostat.
The AGS can also be used to trigger a charge on the batteries, starting the generator when the batteries reach a defined low point, and running until the batteries reach a defined high point.
AGS Setup options
AGS: 03 Run Time
Hour: ________
Recommended setting to
match the value configured for 03-Absorb Time
AGS: 04 Start Temp F: Ext Input Setting this to Ext Input will trigger the AGS when the thermostat calls for A/C cooling or heating. Most Newmar after 2014 can use this Ext Input.
AGS: 05 Start Volts: 11.0 VDC
This setting will trigger the generator based on voltage. See the discussion for “02 – Low Battery Cut Out”, as these values are related. The use of a BMK is much more reliable here too.
AGS: 07 Quiet Time Menu: _______
Choose the appropriate value for quiet time. When a time range is selected, the generator will not auto start.
Enable Auto Generator Start
The settings for AGS determine what will trigger the AGS when the AGS is engaged to the auto mode. Press the “AGS” button on the controller and rotate the select knob to choose between OFF, Enable, Enable /w Quiet Time, Test. When you have enabled the AGS menu, the generator will be triggered by the settings under “04 Start Temp” and “05 Start Volts”.
Advanced Setup
ME-BMK

The Magnum ME-BMK is a single battery bank amp-hour meter that functions like a gas gauge for your battery bank, giving the exact state of charged expressed as a percentage value of 0-100%.
Newmar does not include the ME-BMK on any of their coaches and will not allow it as a special. Installation involves adding 2 additional 2/0 battery cables from the ground to the shunt. Typically, a length of 4ft is long enough for these additional cables. All original ground cables need to be moved from the battery to the opposite end of the BMK shunt. See Figure 7 demonstrating the wiring differences.
Although the ME-BMK will work with the standard ME-RC remote control, the support is limited as is the functionality. In order to utilize all the features, the remote must be replaced with the ME-ARC. This is a direct pluggable swap.
ME-ARC
The Magnum ME-ARC is a direct replacement to the standard ME-RC that offers many advanced configuration options. The primary reason to choose this remote control is to fully utilize the ME-BMK and to properly maintain the batteries. This section covers the settings specific to use with the ME-BMK and assumes the ME-BMK is already installed.
Common ME-ARC + ME-BMK settings
Only the common settings are covered in this guide. Many of the settings will refer to your specific system settings that you documented earlier (A-G).
To enter the settings mode on the ME-ARC, start by pressing the button labeled “SETUP”, and rotate to find the sections 01 thru 06. To enter the desired section, press the dial in, and then continue to rotate thru the options under the section.
01D Max Charge Amps: _______________
Instructions: Follow the steps under Common ME-RC Settings 05-Charge Rate. Compute the Max Charge Rate (C/BMr) and use that value. This entry for ME-ARC expresses the rate in amps, so there is no need to compute the Final charge rate % here, but you will need it for 03E Max Rate Charge below.
02B LBCO Setting: 10.7
Instructions: This is a safety value in case the SOC meter for some reason has not been calibrated properly. The lowest acceptable value for a battery bank under load is 10.5-volts DC. If you are wanting to stretch the battery bank as far as possible, you can safely lower this to 10.5 and adjust the SOC to 20%
02E AC In – SOC: 80%
Instructions: This value is highly personal choice. It should never be lower than 20%. I keep mine set to 80% by default and adjust it lower if I am boon docking. Setting this to a lower value to use more of the battery capacity is safe, as long as it is not set below 20%. Read the note for 02B LBCO for the matching adjustment.
02F Power Up Always: On
03A AC Input Amps: 30
03B VAC Dropout: 90-100VAC
03C Battery Type: _____Flooded ____AGM2 ____AGM1 (Non-Newmar provided)
Newmar coaches will have either Flooded or AGM2. Look at your value in [A] and choose the correct option above. All Newmar AGM batteries are made by Discover, even though they may have a different label. Discover batteries are type AGM2. If you replace these with Lifeline AGM batteries the setting previously was AGM1 but unfortunately Magnum has not kept up with the changes at Lifeline. For Lifeline AGM batteries under the setting “Battery Type” use “Custom” and enter the following values. Absorb=14.3v, Float=13.3v, and Equalize=15.5v. The Custom setting also works for other battery types that do not fit the standard charge profiles of Flooded, AGM1 or AGM2.
03D Absorb Done: SOC
03E Max Charge Rate: ___________
Instructions: Follow the steps under Common ME-RC Settings 05-Charge Rate. Compute the Final Charge Rate % and use that value.
03F Max Charge Time: 18 Hrs
03G Final Charge Stage: ________
Instructions: If your value in [A] is Wet flooded, then you need to use the “MULTI” mode. This will prevent the batteries from over charging and reduce water consumption. The batteries will charge to a full charge and then stop charging until the battery voltage drops below 12.7V, then it will restart charging. The display will read “Full Charge” once it has entered the waiting state.
If your value in [A] is AGM, then the proper value would be Float. This will keep the batteries at a full state of charge.
04A Gen Run VDC: Start Volt: OFF / Stop Volt: OFF
Instructions: The voltage will not be used for AGS since a better option exists with the ME-BMK
04D Gen Run SOC:
Start Gen SOC: 60% is a good balance battery usage/minimal gen run time. Increase up to 80% for max battery cyclic lifetime. Decrease as low as 50% for max battery usage.
Stop Gen SOC: 90% is a good set point to minimize generator run time. Setting it to 95% will add about 30 minutes gen run time and setting to 100% will add 1 hour of additional run time.
04E Gen Run Temp: Set Gen Run Temp Start: Ext Input
Instructions: The voltage will not be used for AGS since a better option exists with the ME-BMK
05A Charge Efficiency: Auto
05B Amp Hour Size: ___________
Instructions: The voltage will not be used for AGS since a better option exists with the ME-BMK
Revisions
Revision 4: Release May 29, 2019
- Clarified that multi-mode final charge will stop charging until the battery voltage is below 12.7v.
- Corrected/Updated the information on Lifeline batteries and the proper custom settings.
Thanks to Don (757driver) for these corrections.
Revision 3: Release May 3, 2019
- Clarified that AGM batteries have a slower self-discharge rate. Previous wording incorrectly stated they had a slower discharge rate.
- Fixed Figure 6 image of factory wiring, it had a missing jumper wire in the image
- Clarified the maximum safe discharge of a battery bank
- Added additional instructions for utilizing the ME-BMK and ME-ARC to maximize battery consumption for maximum boon docking per charge.
Revision 2: Release May 2, 2019
- Minor typographical errors corrected.
- The formula for Battery bank capacity under “Personal Settings Record” was corrected
- Additional details where added for “Why you need a current-based estimation system”
Revision 1: Released May 1, 2019 – Initial release